Birthday pound cake
- Oct 3, 2021
- 7 min read
Updated: Jul 16, 2023
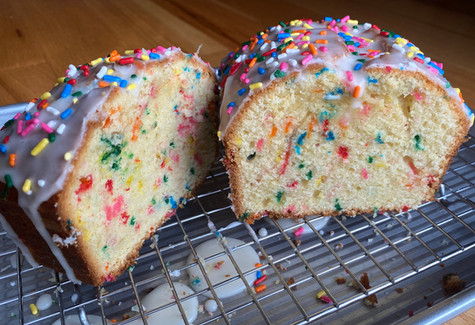
I have always been a big fan of pound cake, and I wanted to make a version that was something extra special. What better inspiration than a funfetti style birthday cake? Not only do the sprinkles brighten up the look of the pound cake, but I knew it would be fun to add a vanilla glaze to really bring out the birthday spirit.
I do recommend using a stand or hand mixer for this recipe, but it comes together in a pinch. The cake itself is a thick batter with rainbow sprinkles mixed throughout, and the glaze is a few simple ingredients that mix together in about a minute making the perfect topping to your cake.
I made this cake twice and there were a few changes I made for the second batch that got me to just the texture I was looking for. One key change was not only reducing the amount of flour, but using cake flour instead of all purpose. I know it's an extra ingredient to purchase, but it really makes a difference in creating a tender end result. It's also an ingredient you can find easily at your local grocery store, so don't worry about having to make a trip to a specialty shop. I also used clear vanilla extract for a bit of an extra birthday cake flavor, but classic vanilla extract will also taste delicious in this.
The other adjustments I made were adding brown sugar and milk to the batter, as well as reducing the amount of eggs. It's not a large amount of brown sugar and milk, only two tablespoons each, but the added moisture is just what the cake needed. Butter is also an important part of pound cake, so if you're in the mood to splurge I would recommend using a European style butter like Plugra.
I used this 8.5 x 4.5 inch pan by OXO. I recommend using a metal pan like this rather than a glass pan. If you have a 9 x 5 inch pan that will work too, you just may need to reduce the cook time by about 5 minutes.
This recipe is perfect for a twist on your typical birthday treat, similar to my Oreo crunch birthday cookies. I sliced mine into 12 pieces, but there are so many ways to customize your cake. You could leave the glaze off all together, add food coloring to the glaze, or even change the sprinkle color.
One last note on carbs for my fellow diabetics before we get to the recipe. The glaze doesn't all "stay" on the loaf because a portion of it drips down and off the sides and some is left behind in the bowl which can make it a bit complicated for calculating the carbs. Because the loaf is cut into 8 or 12 slices it doesn't make a huge difference once you divide it into carbs per slice, but to be safe, I'll provide the carb count in a few different ways. You'll find the carbs for the complete recipe, the total amount for just the glaze and just the cake, as well as for the full recipe with my best guess on the amount of glaze that remains on the cake (about 3/4 of the glaze). One tip you could try as well if you'd like to be REALLY exact, is to quickly measure your prepared glaze before you add it to your loaf. Then, you can measure the glaze that falls off of the loaf once it sets and do the math as to how much did remain on your loaf. If I do that myself at some point, I'll update the recipe with my findings!


Ingredients:
Pound cake
2 sticks (one cup) unsalted butter at room temperature 226g
1 cup granulated sugar 192g
2 tablespoons light brown sugar 24g
3 eggs
2 teaspoons vanilla extract (clear vanilla if you have it)
2 tablespoons milk (I used 2%)
1 1/2 cups cake flour 168g
1/4 teaspoon salt
1/2 teaspoon baking powder
1/4 cup rainbow sprinkles
Birthday vanilla glaze
3/4 cup powdered sugar 90g
2 tablespoons milk (I used 2%)
1/2 teaspoon vanilla extract (clear vanilla if you have it)
1 tablespoon rainbow sprinkles
Total time: 2-3 hours
Prep time: About 15 minutes
Bake time: About one hour
Chill time: 1-2 hours
Cooking instructions:
If you haven't yet, remove your butter from the fridge and allow it to come to room temperature.
Preheat your oven to 350 degrees.
In a medium bowl, combine your dry ingredients - cake flour, salt, baking powder and rainbow sprinkles. Stir until your sprinkles are evenly distributed and set aside.
Place your butter, granulated sugar, and light brown sugar into your stand mixer with the paddle attachment secured. Note: if your butter is not at room temperature already, you can either place it first into the microwave for 5-10 seconds, or mix your stand mixer at a low speed for 30-60 seconds until your butter is softened. Bring your stand mixer slowly from a low to high speed and allow it to combine the butter and sugars for 3 minutes as the color of your butter lightens. If you see butter pockets, pause your mixer, use a spatula to scrape down the sides of the bowl and paddle, then turn your mixer back on for another minute. Scrape down the sides of your bowl and your paddle attachment once more.
Next, crack all three eggs into a separate, small bowl. Add your vanilla extract and milk into your stand mixer and turn your mixer back on at a low speed to start, then up to a medium to high speed until your vanilla and milk are both fully incorporated. Turn your mixer back down to a slow speed and add one egg at a time. Once all three eggs are added and incorporated, let your mixer run for another minute at a medium to high speed.
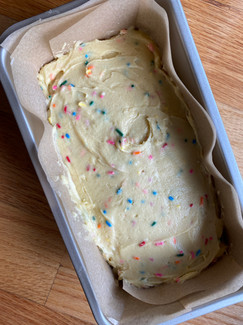
Scrape down the sides of your bowl again, making sure to reach down to the bottom. Add in your dry ingredients. Turn your mixer on slowly to avoid your dry ingredients from flying out of your bowl. Mix at a low speed until your dry ingredients have almost fully combined, about 30 seconds. Pause your mixer and use your spatula to scrape down the sides of your bowl and paddle, then turn back on at a low speed for about a minute. If needed, give your mixture a few more folds by hand. This will help to ensure everything is fully incorporated without over mixing, being sure to reach down to the bottom of your mixer bowl. Grab your 8.5 x 4.5 inch pan and line it with parchment paper. It should cover the long sides and just hang over the top edges of your pan - this will make it easy for removal later. Use your spatula or a large spoon to scoop your batter into your pan and gently press down to smooth your batter and ensure there are no air pockets.
Place your pan into the 350 degree oven for about an hour, checking in at about 50 minutes. You'll know it's done when there is a crack down the center and the rest of the top is golden brown. It may look slightly damp in the center. That is okay, but it should not look wet. Another way to check that it is completely baked is that it shouldn't jiggle much if at all when you shake the pan.
Note: if you used a larger pan, be extra sure to check at 50 minutes. You can also always add 3-5 minutes to your bake time if your cake isn’t done at the end of the hour.
Once you remove your cake from the oven, place it onto a cooling rack if you have one. After 15-20 minutes, carefully remove your cake from the pan and allow it to cool completely. To speed this up, you can also place your cake into the fridge.
Once your cake has completely cooled, about 1-2 hours, you can make your glaze. Into a small or medium bowl, sift your powdered sugar to ensure there are no clumps. Add in about a tablespoon and a half of milk and your half teaspoon of vanilla extract. Quickly stir together with a spoon, and if it's too thick, add in the remaining half tablespoon of milk. It should be thin enough to pour but thick enough that it will coat the cake nicely.
If your cake is on a cooling rack, you can put the rack on top of a sheet pan or other easy to clean surface as some of the glaze will drip off of the cake. With a spoon, add your glaze to your cake spoonful by spoonful, starting in the center and then adding around the edges so that some drips down the sides. You can use your spoon to carefully spread and fill in any open gaps. Take your tablespoon of sprinkles and decorate on top of your glaze however you'd like.
Allow your glaze to set for about 10-15 minutes and then slice and enjoy!
I like to slice my cake into 12 slices. I do this by cutting it in half, then into four sections, then three slices for each quarter of the loaf. You can also do eight slices if you want larger pieces. I recommend enjoying your cake within the first few days for the best taste and texture, and it will stay freshest in an airtight container in the fridge. If the cake feels hard at all or has been in the fridge, put the slice you plan to enjoy in the microwave for 5-10 seconds per side and it will bring it back to life. If you don't plan to enjoy the cake the same day, you can also wait to slice (or even to glaze it), which will help to keep the cake fresh.
You can also absolutely freeze your pound cake. You can do this before or after you add the glaze. My preference is to slice and individually wrap the pieces and freeze them in a plastic bag or other airtight container, and then you can allow the frozen slices to defrost in the fridge when a craving strikes.
Carb and serving info: Servings: 8 or 12 slices
Carbs for full recipe: 521 Carbs per serving (1 of 12): 43
Carbs per serving (1 of 8): 65
Carbs for glaze only: 102
Carbs for cake only: 419
Carbs per slice no glaze (1 of 12): 35
Carbs per slice no glaze (1 of 8): 52
Carbs for full recipe with 3/4 of the glaze: 496
Note: Carb information is calculated based on the specific ingredients I used to cook with to help guide my own insulin to carb ratio when dosing before I eat my home cooked recipes.

Would this just be regular vanilla poundcake if I don’t have the sprinkles ?